
"QUESTER" and "QUESTER | OSAKA"
Online Manual
Controls (Controller)

Controls (Mouse/Keyboard)
| ↑ |
W |
Numpad 8 |
Move Up |
| → | D | Numpad 6 | Move Right |
| ↓ | S | Numpad 2 | Move Down |
| ← | A | Numpad 4 | Move Left |
| Y | Detail / Start Battle | ||
| Q | Switch Quester / Candidate site | ||
| E | Switch Quester / Candidate site | ||
| Left-Click | Enter | Space | OK / Select |
| Right-Click | Cancel / Back | ||
| ESC | Back | ||
| B | Start Battle |
A story that explores the truth of the lost world.
20XX years.
A deadly virus is spreading from a certain country.
As if by design, natural disasters have been occurring across the globe.
The world is in a state of disarray...
The air is polluted. All water is stagnant.
To have any chance at living, it has become necessary to possess special “Aptitudes”.
Horrifying creatures have emerged from underground.
Human civilization has all but collapsed entirely.
Under the broken sky,
Dive into the ruins of civilization - its dungeons - to "search" for something key to the survival of humanity.
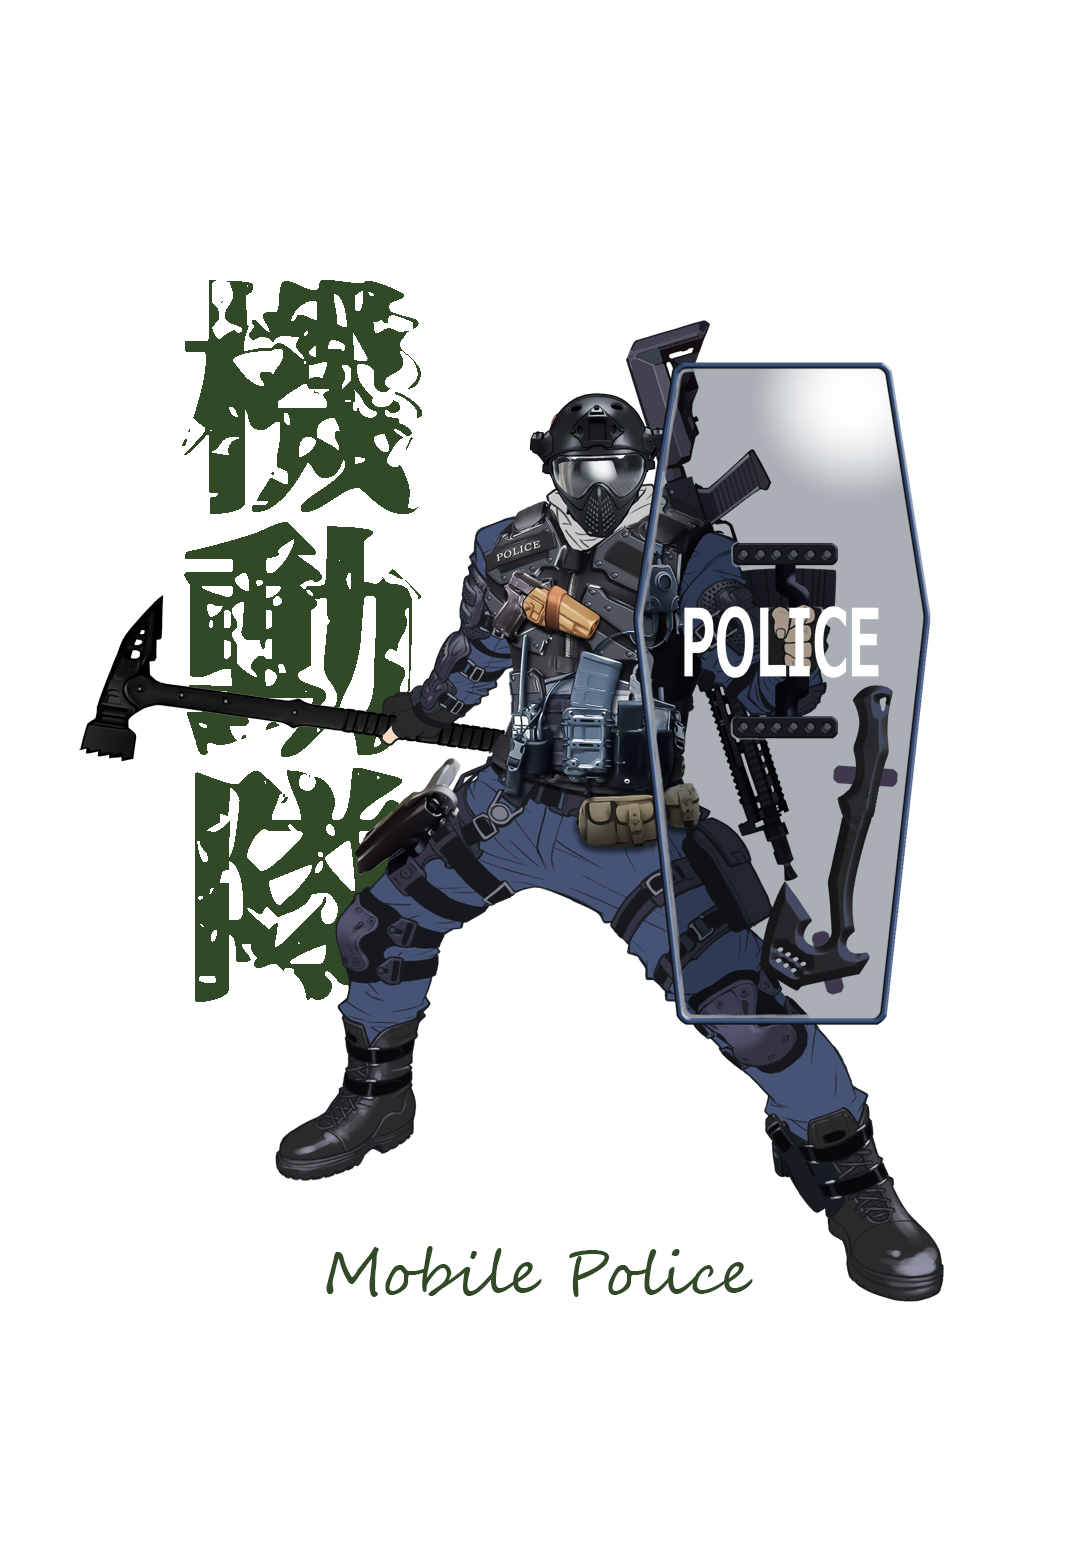
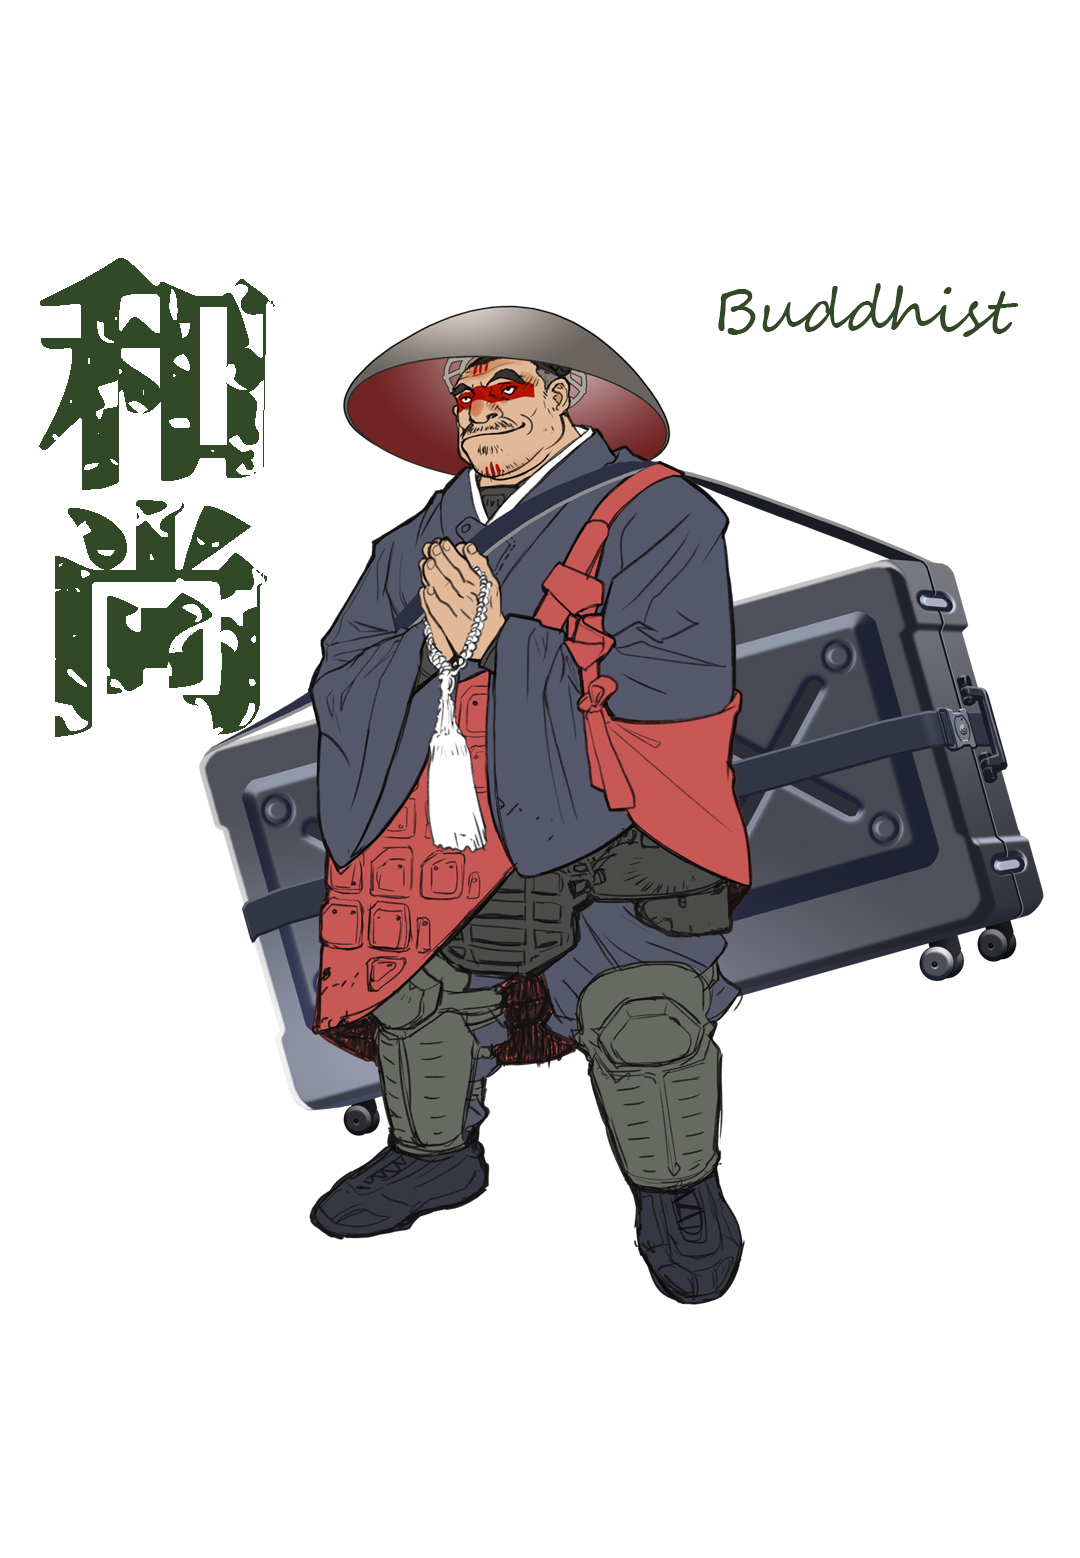
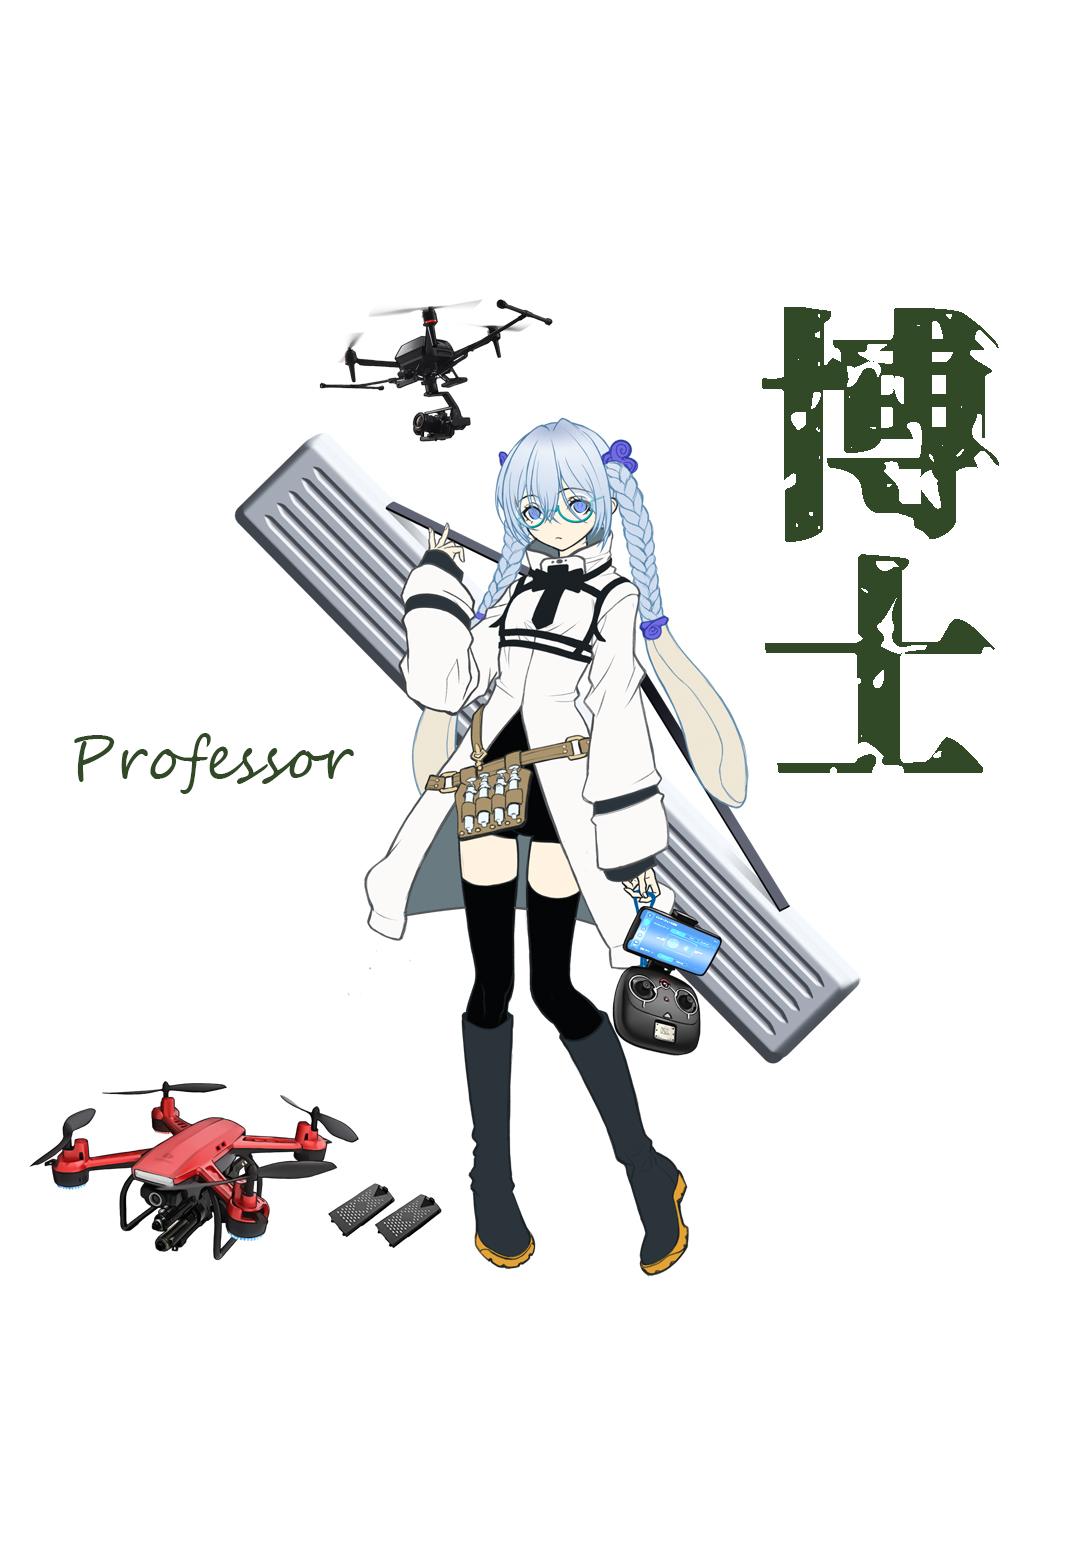
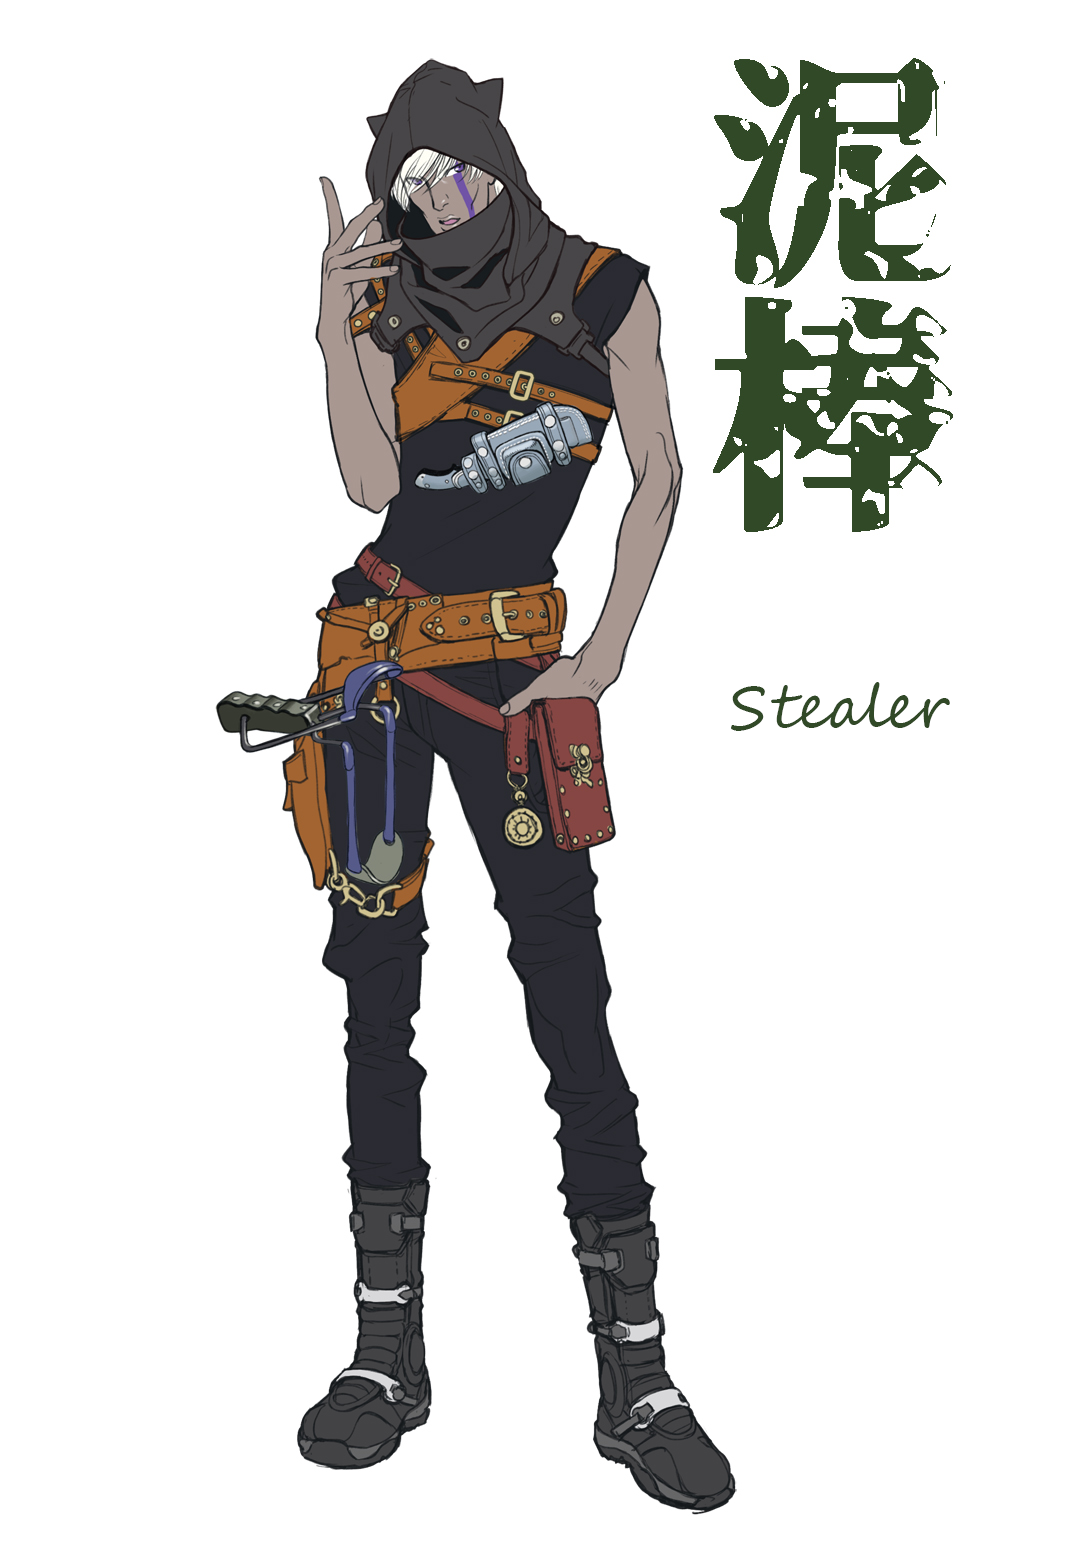
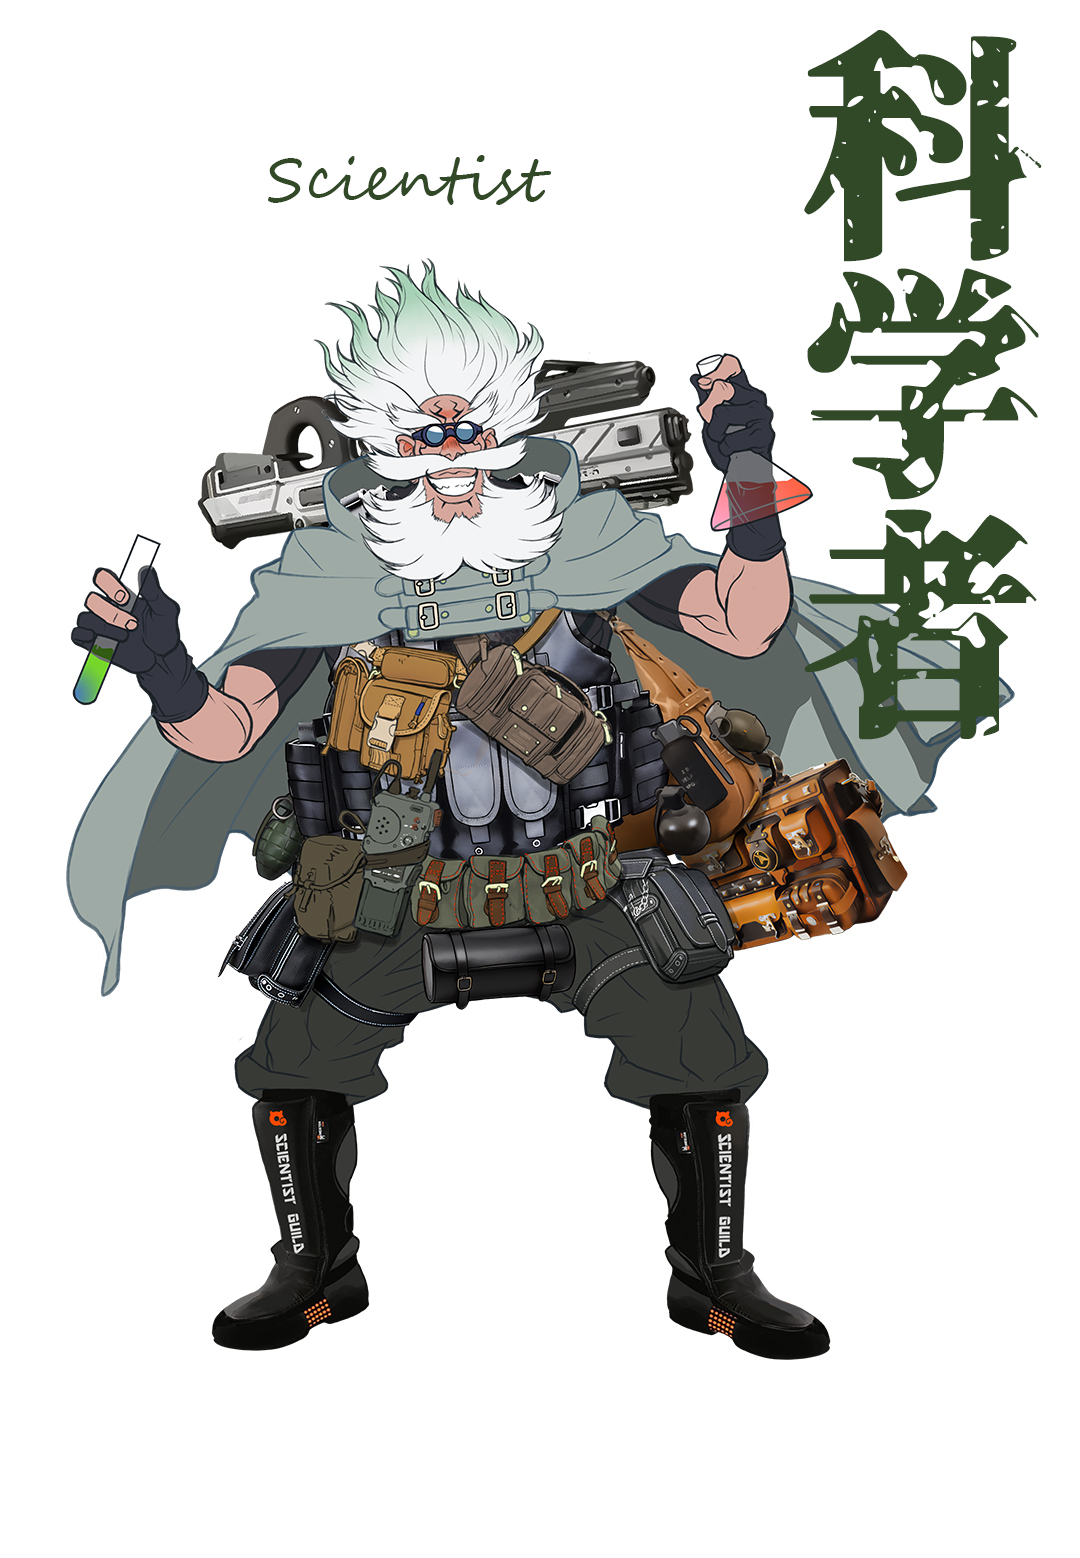
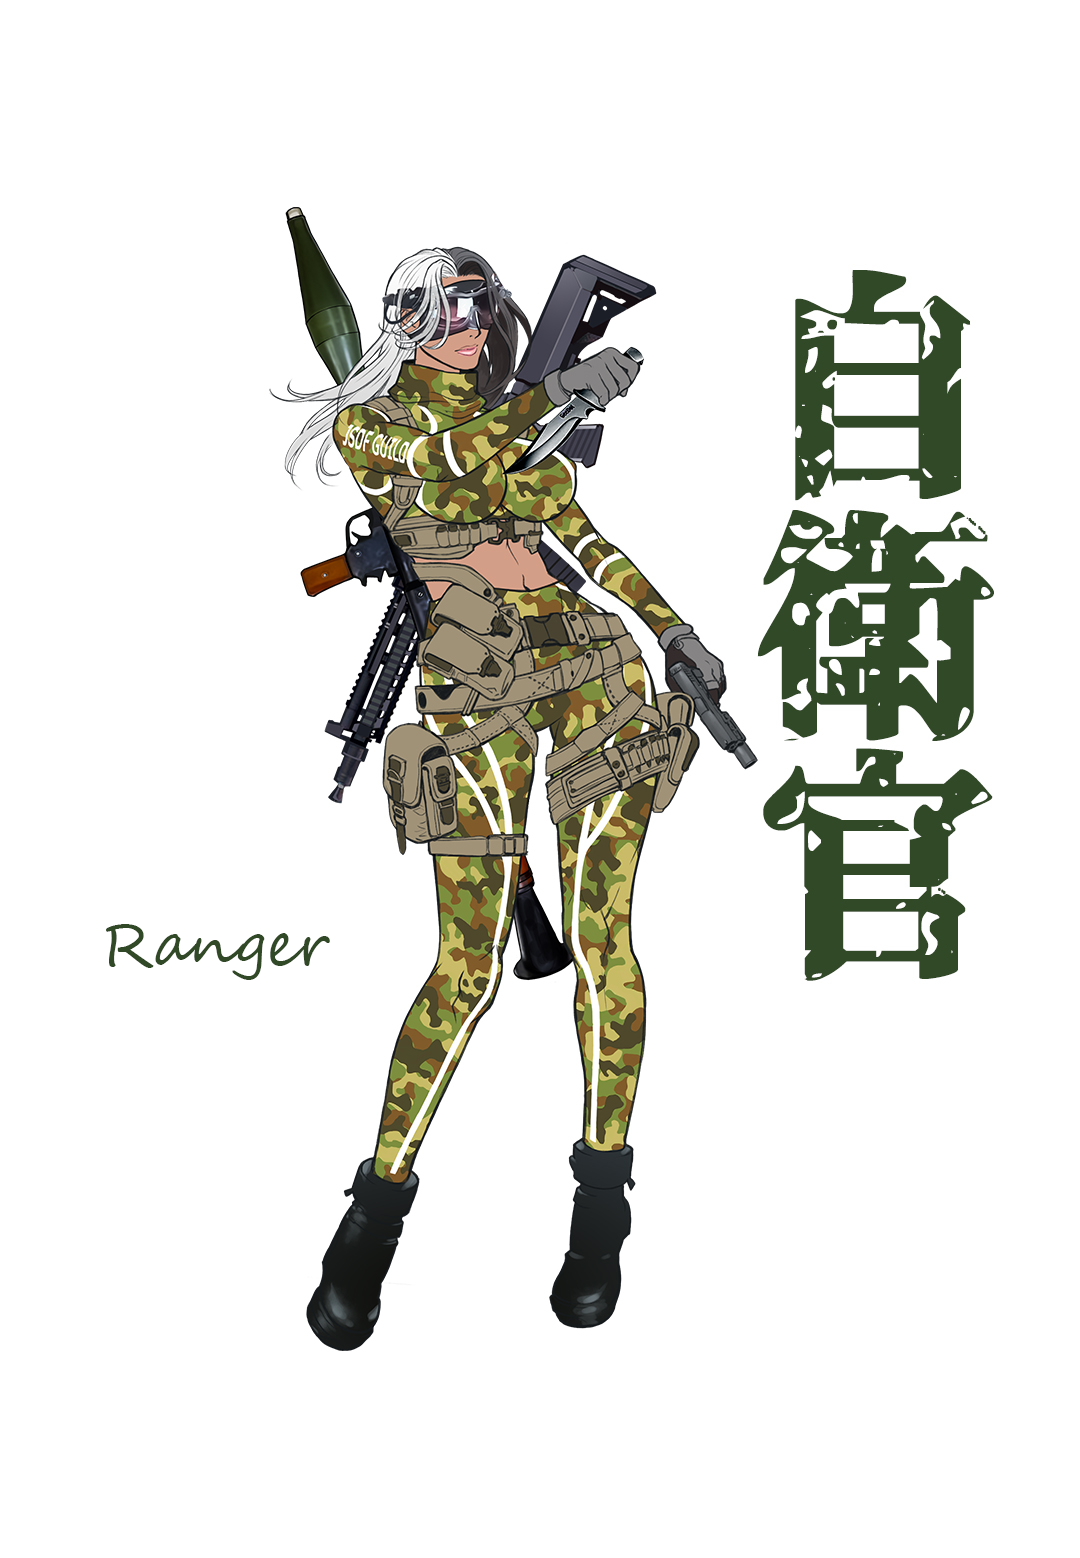
What Is a Quester?
One of a small group of people surviving in an abandoned world.
Character Classes


Battle

Dynamic turn-based battles
- The system works similar to that of other turn-based systems, but you can only enter up to 3 Commands per turn, depending on your character's AP.
- In the same way, different enemies can act multiple times in one turn, with all actions procedurally occurring in order of agility. This makes battles have dynamic turns with multiple character actions overlapping.

HP (28/28 in the bottom right)
Hit Points. This number that indicates how much damage a quester can take. If it falls to 0, the quester is Downed. Once a character is defeated, they cannot be revived in battle except by a special Skill or ability (such as the Buddhist's "Resuscitate" Skill).
Defense Success Rate (Right Shield: 6) / Resistance Success Rate (Blue Shield: 4)
These values represents the estimated "Defense (vs. physical damage)" and "Resistance (vs. non-physical damage)" of the Quester. However, complex calculations are automatically performed based on enemy actions which can impact the actual results. The values shown here are the expected values of these character stats.
Hate (28 in the bottom left)
The degree to which a monster is enraged at the Quester. In general, enemies will target Questers with a high Hate value. However, in rare cases, they may also target based on values other than Hate.

Rule of Command
- A Command is an action that a character will perform, including attacks, debuffs, and in some cases healing.
- Each turn you can select Commands based on the options available. For example, wielding two weapons will allow for two attacks to be performed.
- Even if you see two identical Commands, that means you can potentially execute the same Command twice in a turn. This does not mean that you will lose all your remaining uses of that Command in battle.

Action Points (AP)
- Each Command has a base amount of AP it will consume, which will allow the character to act that turn.
- AP is displayed as "■" in the game.
Number of Commands
- A Quester may execute up to 3 Commands in one turn.
- However, this maximum is limited by the AP rules noted above.
- The total AP of each Command can reach up to ■■■■■ (depending on Skill levels).
- Therefore, a Quester may perform up to 3 Commands based on the amount of AP each consumes from the maximum amount available to them.
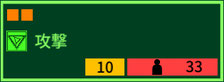
Command
- The number of Commands that are displayed in the game is limited.
- When faced with a strong enemy, you can use the values shown in the above box to plan your attacks.
Color Categories
- Colors: Red, Blue, Green, Gray.
- Red indicates a "physical damage" Command.
- Blue indicates a "non-physical damage" Command.
- Green indicates "healing effects".
- Gray indicates Commands unrelated to any of the of the above categories.
Expected Speed
- This is the estimated Command execution speed.
- Actions in battle will be executed in order of the highest Expected Speed value.
Expected Power
- These values indicated the expected damage and/or recovery you will receive from a Command.
- However, for physical damage (red) values, the estimated Defense of the enemy will also be reduced based on this value, and for non-physical damage (blue), the estimated Resistance values will be reduced.
- Note: The expected Speed and Power values are only estimates. The actual amounts may vary due to the addition of randomly calculated factors.
Target Icon
This indicates who the Command targets range. There are 4 types.

User-targeted Commands

Single-target Commands

Commands that target one horizontal line of enemies

A Command that targets all enemies.
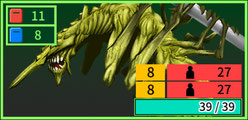
Enemy Command Box
- The notation rules are almost the same as those of Quester. A red Command indicates physical damage, while a blue Command indicates non-physical damage.
- The yellow bar indicates the enemy's expected execution speed.
- The only difference is that, unlike the values shown for Questers, which are "expected values" impacted by randomly calculated variables that occur during the execution phase which can increase or decrease the resulting values, enemy values can be interpreted as shown.
- It is up to you whether you use this information in planning your turn.
Criteria for Questers to target enemies
- The criterion for aiming at a Quester is Hate, but the criterion for aiming at an enemy from a quester is "Remaining HP", with lower HP enemies prioritized over higher HP ones.

Battle Resources
- During battle, some Commands will consume Battle Resources.
- There are five types of Battle Resources "Drug/Bullets/Explosives/Batteries/Gadgets".
- For example, shooting with a Handgun consumes Bullets, while firing flames from a modified vacuum cleaner consumes Explosives and Batteries.
Basic maximum
- A base maximum amount is set for all battle resources.
- This value is impacted by the effects of some Skills, Equipment, etc.
- After a battle ends, you can fully restock Battle Resources without incurring any costs up to your Quester's maximum amount.
How to Recover Battle Resources during battle?
- Each Battle Resource requires a specific Command to allow for recovery during battle.

Buff/Debuff
A buff is a "continuous strengthening effect", while a debuff is a "continuous weakening effect."
They consist of the following types.
List of buffs (icons in the upper row of the image are explained from left to right)
- Attack Success Rate: A buff that increases the success rate of Attack-based Commands. Damage dealt by the character is raised closer to the maximum potential amount.
- Defense Success Rate: A buff that increases the success rate of Defense-based Commands. Physical damage prevented by the character is raised closer to the maximum potential amount.
- Resistance Success Rate: A buff that increases the success rate of Resistance-based Commands. Non-physical damage prevented by the character is raised closer to the maximum potential amount.
- Burn Resistance: When you receive the "Burning" debuff, this value is deducted first. Any values that exceed this amount will be received as fire damage.
- Bleeding Resistance: When you receive the "Bleeding" debuff, this value is deducted first. Any values that exceed this amount will be received as wound damage.
- Poison Resistance: When you receive the "Poison" debuff, this value is deducted first. Any values that exceed this amount will be received as poison damage.
- Paralysis Resistance: When you receive the "Paralysis" debuff, this value is deducted first. Any values that exceed this amount will be received as paralyzing damage.
List of debuffs (icons in the bottom row of the image are explained from left to right)
- Attack Success Rate Down: A debuff that decreases the success rate of Attack-based Commands. Damage dealt by the character is lowered away from the maximum potential amount.
- Defense Success Rate: A debuff that decreases the success rate of Defense-based Commands. Physical damage prevented by the character is lowered away from the maximum potential amount.
- Resistance Success Rate: A debuff that decreases the success rate of Resistance-based Commands. Non-physical damage prevented by the character is lowered away from the maximum potential amount.
- Burning: Character is on fire. The HP of a character in this state is reduced by the amount shown at end of the turn. This amount is halved each time your character performs an action.
- Bleeding: Character has a wound excessively leaking blood. The HP of a character in this state is reduced by the amount shown at end of the turn. This amount is halved each time your character performs an action.
- Poison: Character is infected with venom. The HP of a character in this state is reduced by the amount shown at end of the turn. This amount is halved each time your character performs an action.
- Paralysis: The character's body is paralyzed, making it difficult for them to move. At the beginning of the turn, a character in this state will potentially have their turn nullified with the value shown representing the percentage chance of this occurring. The amount disappears when the character successfully performs an action.
Battle Results
- In this game, you don't have to manually restore your character's HP every time you win. However, Purification Fuel (described later) will be consumed automatically based on the amount of missing HP.
- Any Downed characters will be automatically revived (Consuming 30 Purification Fuel each).
- All characters' HP is fully restored to their maximum (However, Purification Fuel will be consumed equal to the amount of HP recovered)
- Battle Resources are also fully replenished to their maximum (with no Purification Fuel consumption).
Withdrawal
- In this game, if you choose to withdraw from battle, escape is guaranteed.
- If the battle situation becomes dire, you can quickly flee and regroup.
- However, you will lose 20 Purification Fuel.
Annihilation
- If the HP of all party members reaches 0 or less, your party will be knocked out.
- In the event that a battle is lost, the following penalties will be applied:
-
- Automatically returned to base
- Food is halved
- Materials are halved.
- Each quester's experience will be reset to the initial value of their current level.
Dungeon

Dungeon Exploration
- This game consists only of dungeons. Questers live in and explore dungeons.
- Some dungeons contain a variety of creatures, including enemy monsters. Sometimes you can find a safe, from which you can obtain Equipment and other items.
- In order to survive, you must also have the necessary provisions (Food) to sustain yourself (more on this below).

Purification fuel
- This special item has the effect of neutralizing the atmosphere inside the dungeon.
- It is used to purify the surrounding area, and it serves as a vital source of fuel for items and techniques used in battle.
- In the game, every action taken in the dungeon consumes Purification Fuel.
- This also means that if your Purification Fuel runs out, that day's search ends.
- It is restored to its maximum value when you depart from the Base.

Food and food gathering deadline
- Food is necessary for survival.
- While in the dungeons, the Food you acquire is mostly sourced locally.
- You may be able to obtain Food by exploring Food spots, or defeating enemies to obtain meat.

Food Gathering Deadline
- Food in the game isn't something you consume every day.
- Instead, your party has a set date, and collecting the required amount of food by that date will allow your characters to avoid starving.
- At the beginning of the game, you will need to gather 100 food items before 10 days pass.
- If you do not gather enough food by the deadline, the Questers will become desperate. You will lose all of your current Materials and potentially even some Equipment.
- After the deadline has passed, the Food value will be reset to 0 and all excess Food collected by the deadline will be converted into Materials. This means there is no waste.
- Each time you add a new member to your party, your required Food supply will increase.

Materials
- Materials are things that can be used in the wasteland, such as resources, supplies, wood, medicinal herbs, ores, and electrical appliances.
- In this game, Materials can be combined for various purposes.
- For example, this function can serve to acquire money for training when "leveling up" a character (more details below).
- You can also use this function to remodel weapons that you obtain in the dungeon, as well as disassembling weapons (more details below).

Key
- Some dungeons have doors that can't be opened by normal means. To unlock them, you'll need a key.
- In terms of the game world, this can be represented by an actual key for a lock, or in some cases a card key, but in terms of the actual objects, all are treated the same and the number your party possesses is indicated by the above icon.
- In short, any one key can open any one door.

Breakable Wall
- In the dungeon, you will find walls that you can break into Debris, which you can find items in.
- These walls are easy to break, just walk into them to smash them.
- However, you'll consume 10 Purification Fuel when doing so.

Candidate Site
- While exploring, you may discover places that can serve as Base candidates.
- These are quiet, private areas of the map.
- Finding these locations will increase the number of potential locations that can be selected when choosing the "Base Movement" menu option at your Base.
What happens when you discover a new Base Candidate Site?
- You may also be able to locate allies who have barricaded themselves in the site.
- As you explore, you'll unlock many new base locations, and gain new allies in the process (in the closed beta version, due to development limits, you will only discover clones of existing party members).

Food Spot / Material Spot
- There are spots in the dungeon where Food grows and Material spots where old world junk has accumulated.
- When you find these spots, walk into them to search them. You may discover a lot of Food, Materials, or other items.
- Each search action consumes 5 Purification Fuel.

Treasure Spot
- In some dungeons, you may discover relics from the past or those of other Questers.
- For some reason, these items are stored in Safes and must be broken into to be obtained.
- Safecracking is easy: Simply walk into the Safe (the result of the attempt is automatically determined at random).
- If you successfully crack a Safe, you'll unlock the secrets hidden inside it.
- Each Safecracking attempt consumes 5 Purification Fuel.
- There are three levels of Safes: light blue, silver, and gold, with the latter being the most likely to contain the best stuff. However, higher level Safes are also more difficult to crack!

Enemy Spot
- There are spots in the dungeon where Enemy nests are located.
- Enemies will often roam around near these spots.
- However, these spots are also a great opportunity.
- By walking into them, you may discover something that the enemy has collected, and you can take it for your own use while exploring (consumes 5 Purification Fuel).
- The items found in these sports are a surprise.

Stun Light
- A character you recruit may know the "Stun light" Skill.
- Select the flashlight icon to stop the movement of enemy symbols.
- It can be nice to use it when faced with obstacles.
- In addition, all affected Enemies' stats are enhanced and your party will gain additional experience points from defeating them.
- Use this Skill to earn extra experience.
- However, while using the Skill, your actions will consume more Purification Fuel than normal.

Radar
- A character you recruit may also know the "Radar" Skill.
- By selecting the footprint icon, you will be able to clearly see the entire map within the range of your game screen.
- This Skill consumes 5 Purification Fuel when used.

Body of water and Canoe ("QUESTER | OSAKA" Additional elements)
- A new body of water to explore is now available. To enter a body of water, you must depart from a pier.

- When a player moves from a pier to a body of water, the player symbol changes to a canoe, allowing the player to explore the body of water.
- However, when in the "canoe state", the player must also go through a pier in order to travel on land again.

- Enemies are also present in bodies of water.
- They can only be interacted with when in the "canoe state". (Enemies in a body of water will not attack you when you are on the ground, and vice versa).
- Moving onto a body of water consumes 3 Purification Fuel.
Base

- The Base is where your Questers live and camp.
- When entering a dungeon, the Questers ride in a converted camper with a "Purification Fuel Refiner".
- This vehicle is very important and cannot be exposed to battle.
- So, your party must always set up camp in a safe place and explore the dungeon on foot from there.
- Game-wise, this is your Base of operations, from which you can travel, explore, and then return to.
Menu Commands

Return (Dungeon)
- Return to your Base.
- When you're cornered by creatures and you just can't deal with them, this is your best option.

Level Up (Base)
- Experienced questers in the dungeon can be trained at the Base to increase their level.
- To level up this way, you will need to have the necessary Materials to consume: determined by the formula (current level-10) x 1. This means that you won't need to consume Materials for leveling a character until they reach level 10.
- Even if you have the necessary experience points, you won't be able to level up characters past level without the necessary Materials (they are required for training).
Depart for the dungeon (Base)
- Leave the Base and set out for the dungeon.
- Purification Fuel is set to the maximum.

Base Movement (Base)
- Once you find a suitable Base location, you can drive your party's camper van there to relocate your Base of operations (unfortunately, you won't be able to enjoy the driving scenery while in game).
- Once you're Base is relocated, your next dungeon exploration will start from that location.
- Relocating your Base consumes 30 Food.
Workshop (Base)
- Part of the camper is a workshop directly connected to the Purification Fuel refiner.
- Here you can dismantle Equipment and convert them into Materials.
- You can also "Modify" weapons by combining multiple copies.
- You'll need Materials to do this.
- Note: You cannot modify Accessories.

Information Terminal
- Information about enemies that have been defeated by your party in battle will be recorded in a digital encyclopedia as creatures.
- Equipment you have obtained will also be recorded in the encyclopedia.
- You can also check the status of retained equipment for your current playthrough.
- You can check the contents of these by using the Information Terminal.

Party Screen(Base / Dungeon )
- Depending on whether you are in the Base or the dungeon, you can change party members' Equipment and formation, or which party members to explore the dungeon with/put on standby.
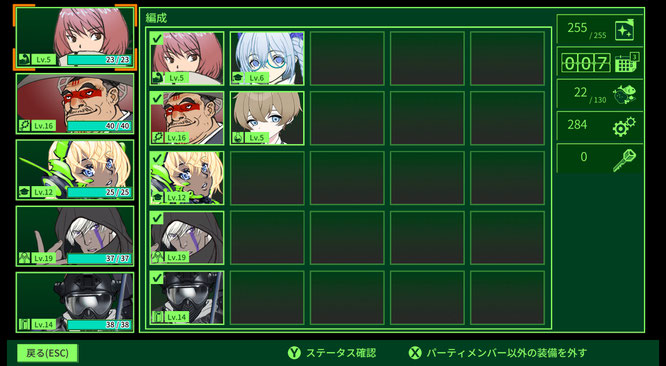
Party Assembly at the Base
When assembling your party at the Base, you can switch current party members with those on standby and change members' Equipment.
Organization in the dungeon
You can't switch between your party members while in the dungeon (obviously, since they're back at your Base) but you can change their Equipment and change your party formation.
Formation (Party Formation)
In this game, there is no defined forward or rear line in your party formation. However, in the event of multiple "equal conditions" being met when a Command target is being determined, characters at the front of the party will be prioritized. This priority for Command execution is also maintained in instances where character speeds and Hate values are the same.
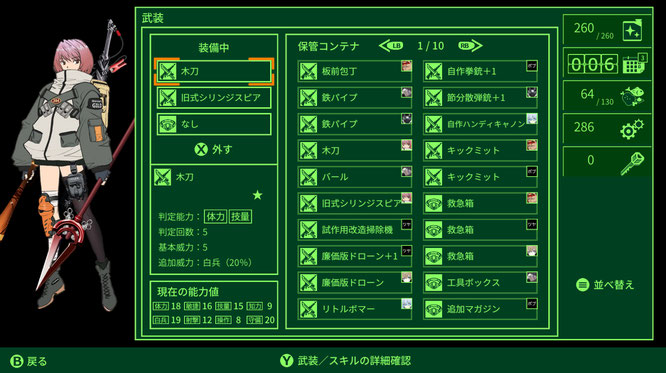
Equipment
Each Quester can be equipped with three pieces of Equipment; up to 2 Weapons and 1 Accessory.
Weapons
Equipment that can be used for Attack actions in battle. Most weapons provide characters Skill actions such as Attack, Slash, and Flame Radius, and sometimes also bestow passive Skills such as Battery +.
Accessories
The term Accessory refers to Equipment other than Weapons, such as Safety Helms, Tool Boxes, and First Aid Kits.
NEW GAME +
NEW GAME+ Overview
- Once the game is cleared, you can continue to enjoy game by restarting the campaign, which carries over the cleared data.
- All characters who were in your party in the previous playthrough will be carried over into the next one.
- All weapons obtained in the previous play will be "retained" in the next one. However, only one accessory of each type will be carried over.
- When the clear data is loaded, you can check the weapons catalogued as retained for the next playthrough via the "Encyclopedia".
- Even during a playthrough, your currently retained weapons can be checked via the "Encyclopedia".
- The maximum Purification Fuel level (up to 500) will be carried over.
- The default maximum level is increased by 2 for each playthrough (up to a maximum of 10 additional playthroughs).
Start Conditions
- One member of each class will be randomly selected from the retained characters to make up your starting party.
- You start with 5 weapons randomly selected from the default and retained weapons pools.
- Your starting members begin the playthrough "unequipped," so make sure to equip them with the weapons you have.
Reappearance of Retained Character
- Each cycle of the game, one of the retained characters will be randomly selected to join your party.
- When a Base is discovered, it is randomly determined whether an undiscovered character, or retained character, or a material will appear (undiscovered characters are the most likely to appear).
- The maximum number of characters that can appear in a single game is 25. (Even if the carried over characters are not all acquired in a given playthrough, they will be carried over into the next playthrough.)
Reappearance of Retained Weapons
- Each cycle of the game, you will obtain one of your retained weapons at random.
- When you break debris, there is a small chance of a random retained weapon being discovered as loot.
- Retained weapons can also be randomly attained when new Bases are discovered.
- Note: The rarity of retained weapons is determined by zone progression . Therefore, if you choose to carry over lower rarity items as retained weapons, you will be able to progress more effectively through the start of your next playthrough.
Enemy Strength
- Enemies scale in strength based on the "+" value of the playthrough.
- Any damage caused by enemies is increased by +2.
- Enemy Defense and Resistance base value increases by +1.
- Maximum HP of Enemy increases by +30%.
- Experience gained from enemies will also be slightly increased.
- Note: Some enemies are exceptions to these rules.
NEW GAME+ Limit
- NEW GAME +10 is the max scaling available.
- All subsequent playthroughs will be at +10.
This online manual is a prototype created by volunteer Entlang .
After that, Thousand Games renewed on July 7, 2023.